Better in Vacuum
Park Systems NX-Hivac allows failure analysis engineers and researchers to improve the sensitivity and resolution of their measurements through scanning spreading resistance microscopy (SSRM) in high vacuum. Because high vacuum scanning offers greater accuracy and better repeatability than ambient or dry N2 conditions, users can measure a wide range of dopant concentration and signal response in failure analysis applications.
The high vacuum SSRM, available on Park NX-Hivac, enables 2D carrier profiling of next generation devices and measures the high resolution AFM images at the same time to improve production yield. The measurements show much higher accuracy and resolution than in ambient condition. Due to the very high sensitivity and responsiveness to the current signal, SSRM also ensures a high repeatability, providing a high-level tool for semiconductor failure analysis.
In addition, the integration of a new operational AFM mode called PinPoint™ with SSRM enables acquiring topography, electrical and mechanical property data simultaneously. Furthermore, operating in an approach-retract manner greatly reduces friction and tip wear compared to standard SSRM.
SSRM enables:
- • higher sensitivity and resolution in high vacuum compared to the ambient conditions
- • higher accuracy and repeatability of the measurements,
- • acquisition of multiple properties simultaneously (electrical, mechanical, topography),
- • longer tip lifetime and reduced sample damage when performed in PinPoint™ mode,
- • frictionless imaging when performed in PinPoint™ mode.
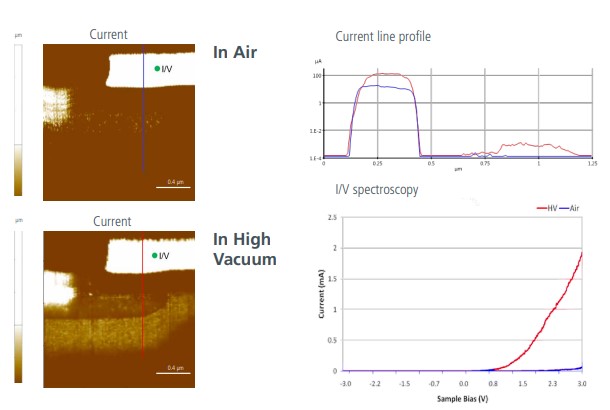
SSRM in Air vs. High Vacuum

Stronger current in vacuum than in ambient conditions due to better tip-sample contact
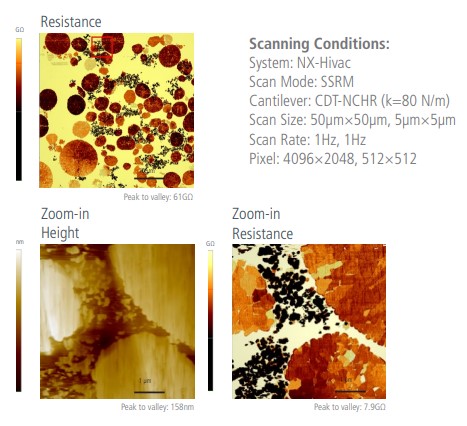
SSRM of Li ion battery electrode

Conductive Atomic Force Microscopy in High Vacuum
conductive AFM (C-AFM)
performed in high vacuum significantly improves material analysis. C-AFM simultaneously measures topography and electrical properties (conductivity) of samples by using the AFM tip as a nanometer-scale electrical probe. More specifically, it monitors the current flow between the conductive tip and sample when bias is applied. At the same time, it records the cantilever deflection as the tip scans over the sample surface, which results in a topographic threedimensional image. The measurements can be performed in contact mode, tapping mode, or PinPoint™ mode. The latter one operates in an approachretract manner, ensuring a frictionless operation which eliminates the lateral forces caused by continuous tip-sample contact during scanner movement. Performing C-AFM measurements in high vacuum improves the quality of the image significantly. In particular, the measured current increases by three orders of magnitude in comparison to ambient conditions and features high homogeneity. The current maps taken in HV also show remarkably more details than taken in air.

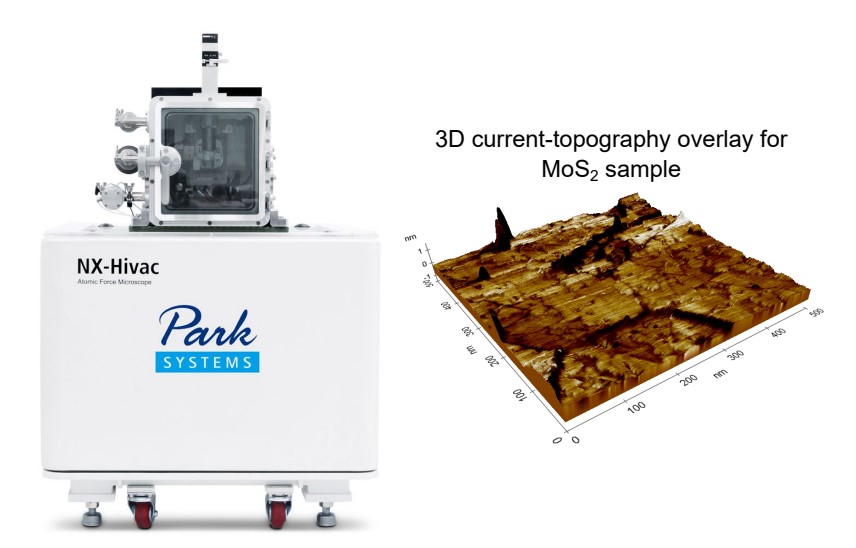
Park NX-Hivac high vacuum AFM and 3D topography image overlaid with the current signal, recorded in high vacuum
C-AFM enables:
- • obtaining high quality data for both topography and current measurements,
- • homogeneous and higher current signal when performed in high vacuum in comparison to ambient condition,
- • high resolution imaging due to the elimination of frictional force when performed in PinPoint™ mode,
- • accurate mapping of the current variations at the surface due to ability to control the contact force and time when performed in PinPoint™ mode.
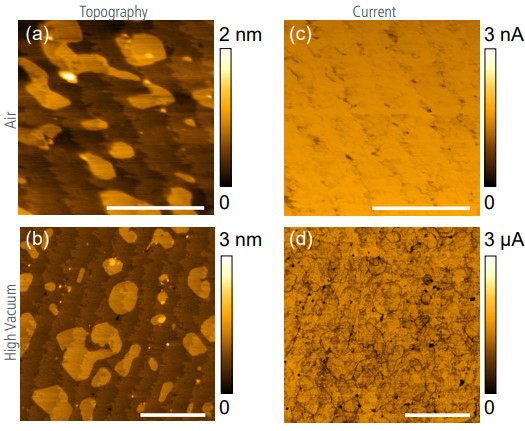
cAFM in Air vs. High Vacuum

cAFM from the same 3-4 layered MoS2 sample showing the increased current level and sensitivity under high vacuum. (a) and (b) Topography (c) current images in air at 5 V bias. and (d) current images taken immediately after pumping to high vacuum at 0.5 V bias. The data taken in air and high vacuum was acquired using identical parameters: same probe with spring constant k of 7 N/m, set point of 10 nN, and 1 Hz scan rate. Scale bar is 500 nm.
Image courtesy: IMEC, Leuven, Belgium
